The User Role Section
The following image illustrates the user role section of the Application Security application Roles|Basic page:
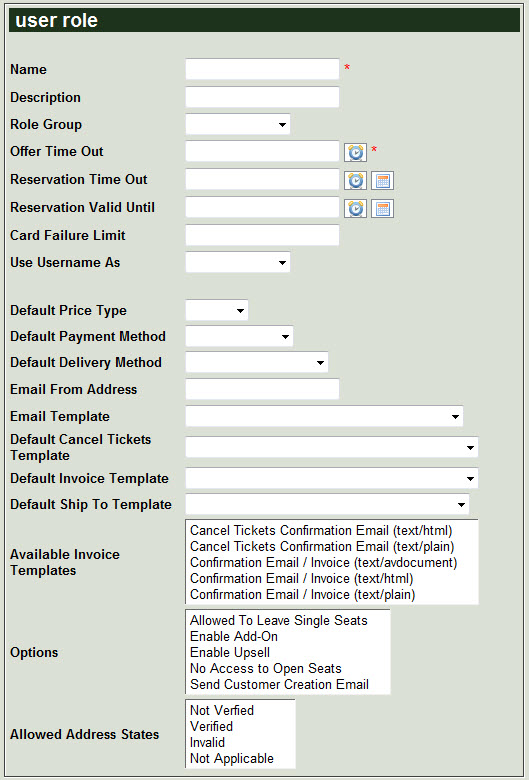
The user role section of the Application Security application Roles|Basic page contains the following properties:
|
Field |
Description |
|
Name |
The user role name. |
|
Description |
The description of the user role. |
|
Role Group |
The group associated with the role. |
|
Offer Time Out |
The amount of time that the user role has to complete an order before an offer times out and the seats become available again. This is particularly important for AudienceView Online/Mobile users. The defined 'Offer Timeout' values override each other in the following order:
-
The Venue Configuration application Performance|Calendar page
-
The Venue Configuration application Series|Calendar page
-
The Application Security application Role|Basic page
-
The Registry application Registry::EN::Session::Offer Timeout node
Enter a relative date into the field or click or  to select the relative date. to select the relative date.
For more information, refer to Using Relative Dates and Times.
|
|
Reservation Time Out |
The predetermined length of time from the reservation creation date that offers will remain available for the role.
Enter a relative date or date into the field or click or  to select the date or relative date. to select the date or relative date.
For more information, refer to Using Relative Dates and Times and Using a Calendar to Add a Date.
The time/date defined by the role will be overridden by any other 'Reservation Time Out' settings placed on a series, performance, miscellaneous item or gift. |
|
Reservation Valid Until |
The predetermined length of time from the performance start date that offers will remain valid until.
Enter a relative date or date into the field or click or to select the date or relative date.
For more information, refer to Using Relative Dates and Times and Using a Calendar to Add a Date.
The time/date defined by the role will be overridden by any other 'Reservation Time Out' settings placed on a series, performance, miscellaneous item or gift. |
|
Card Failure Limit |
The predetermined number of times that a credit/debit card transaction can fail for the role. |
|
Use Username as |
Determines what, if anything, that users will be forced to use as their user names:
|
|
Default Price Type |
The default price type that the role can sell (e.g. if Adult is selected then, by default, the Adult price type will automatically be selected for the user). |
|
Default Payment Method |
The default payment method defines the types of payments that a particular role can except (e.g. if Cash is selected then, by default, the Cash payment method will automatically be selected for the user). |
|
Default Delivery Method |
The default delivery method defines the ways in which the role can deliver tickets to customers (e.g. if Window Sales is selected then, by default, the Window Sales delivery method will automatically be selected for the user). |
|
Email From Address |
The email address that any correspondence will be sent from for the role. |
|
Email Template |
The default Order Confirmation Email that will be sent by the role:
-
Order Confirmation Email (text/avdocument): Creates a PDF version of the order confirmation.
-
Order Confirmation Email (text/html): Creates an HTML version of the order confirmation.
-
Order Confirmation Email (text/plain): Creates a plain text version of the order confirmation.
The default Order Confirmation Email can also be set globally via the Registry. For more information, refer to Setting the Email Confirmation Template.
|
|
Default Cancel Tickets Template |
The default Cancel Tickets Confirmation Email that will be sent by the role:
-
Cancel Tickets Confirmation Email (text/html): Creates an HTML version of the cancellation email.
-
Cancel Tickets Confirmation Email (text/plain): Creates a plain text version of the cancellation email.
The default Order Confirmation Email can also be set globally via the Registry. For more information, refer to Setting the Cancel Tickets Confirmation Email Template.
|
|
Default Invoice Template |
The default Invoice Email that will be sent by the role:
-
Confirmation Email / Invoice (text/avdocument): Creates a PDF version of the invoice.
-
Confirmation Email / Invoice (text/html): Creates an HTML version of the invoice.
-
Confirmation Email / Invoice (text/plain): Creates a plain text version of the invoice.
The default Order Confirmation Email can also be set globally via the Registry. For more information, refer to Setting the Email Invoice Template.
|
|
Default Ship To Template |
The default Ship-To Confirmation email that will be sent by the role:
-
Order Confirmation Email Ship To (text/html): Creates an HTML version of the ship-to order confirmation.
-
Order Confirmation Email Ship To (text/plain): Creates a plain text version of the ship-to order confirmation.
The default Ship-To Confirmation can also be set globally via the Registry. For more information, refer to Setting the Order Confirmation Ship To Template.
|
|
Available Invoice Templates |
The Confirmation Email templates that are available to the role:
-
Confirmation Email / Invoice (text/avdocument): Creates a PDF version of the invoice.
-
Confirmation Email / Invoice (text/html): Creates an HTML version of the invoice.
-
Confirmation Email / Invoice (text/plain): Creates a plain text version of the invoice.
To make more than one Confirmation Email / Invoice template available to the role, hold CTRL or SHIFT while making your selections.
|
|
Options |
The options that the role can:
-
Allowed To Leave Single Seats: The role will be able to leave a single seat available within a row/section of sold seats.
-
Enable Add-On: The role will be presented with any add-on articles/items that have been associated with the selected items, and must be explicitly dismissed by the user.
Add-on article/item links will still be available if this option is not selected, but the user must click on the available links to view the article/item.
-
Enable Upsell: The role will be presented with any upsell articles/items that have been associated with the selected items, and must be explicitly dismissed by the user.
Upsell article/item links will still be available if this option is not selected, but the user must click on the available links to view the article/item.
-
No Access to Open Seats: The role will not be able to sell/purchase open seats, and will only be able to sell/purchase seats that are on hold.
-
Send Customer Creation Email: The role will send an email to the address associated with an account when the account is created.
To make more than one option, hold CTRL or SHIFT while making your selections.
|
|
Allowed Address States |
The default address states that the role can accept and complete an order:
-
Not Verified: The address does not have to be verified.
This is the default address state. If a verified address is updated, the address state returns to Not Verified.
-
Verified: The address must be verified (e.g. for orders sent to customers through the mail).
-
Invalid: The address does not have to be valid (e.g. the user attempts to verify the address, but does not select one of the returned addresses).
-
Not Applicable: A valid address is not required to complete an order (e.g. for walk-up box office sales).
|
The Assign Users Section
The following image illustrates the assign user section of the Application Security application Roles|Basic page:
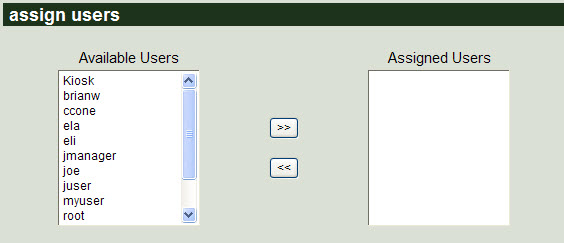
The assign user section of the Roles|Basic page allows you to assign specific user's to the current role. To assign an available user to a role, select the users from the Available Users list and click '>>' to move them to the Assigned Users list. To remove a user from the Assigned Users list, select the user and click '<<'.
 |
Information
To select more than one user, hold CTRL or SHIFT while making your selections. |
The Restrict Venues Section
The following image illustrates the restrict venues section of the Application Security application Roles|Basic page:
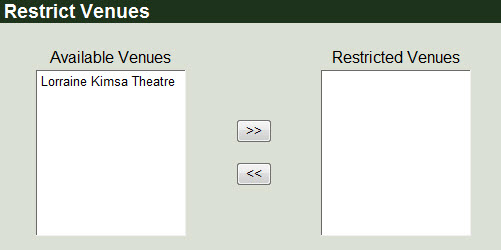
The restrict venues section of the Roles|Basic page allows restrict a role's access to certain venues. To restrict an available user from accessing a specific venue, select the venue from the Available Venues list and click '>>' to move them to the Restricted Venues list. To remove a venue from the Restricted Venues list, select the venue and click '<<'.
|
|
Information
To select more than one venue, hold CTRL or SHIFT while making your selections. |
The Suppressed Warnings Section
The suppressed warnings section allows you to prohibit certain warning messages from appearing for a particular role. For example, by default if an order is unpaid, users must enter a reason. Suppressing the warning enables users to create an unpaid order without entering a reason.
The following image illustrates the suppressed warnings section of the Application Security application Roles|Basic page:

If your list of suppressed warnings exceeds the maximum list size set in the Registry application's Registry::EN::Application node's 'Max List Size' field, the  icon will appear next to list.

For more information, refer to Suppressing Warning Messages.
The Role Data Section
The following image illustrates the role data section of the Application Security application Roles|Basic page:
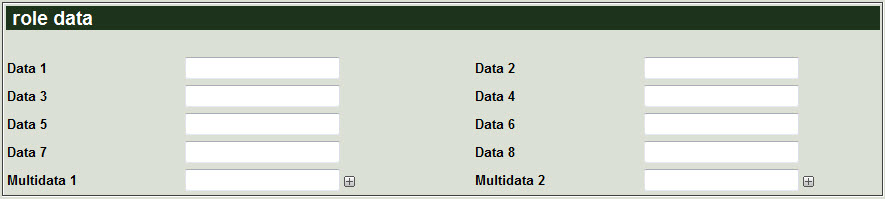
The role data section of the Application Security application Roles|Basic page contains the following properties:
|
Field |
Description |
|
Data [1-8] |
Enables you to store additional information specific to your organization.
Any data entered into these fields is searchable through Business Intelligence. To modify a data field label, navigate to the Registry application Registry::EN::Business Objects::TSuserRolesBO::User Role node and select the field that you want to re-label. |
|
Multidata [1-2] |
Enables you to store additional information specific to your organization. To add additional fields, click  or press CTRL+TAB once you have made an entry. or press CTRL+TAB once you have made an entry.
Any data entered into these fields is searchable through Business Intelligence. To modify a multidata field label, navigate to the Registry application Registry::EN::Business Objects::TSuserRolesBO::User Role node and select the field that you want to re-label. |