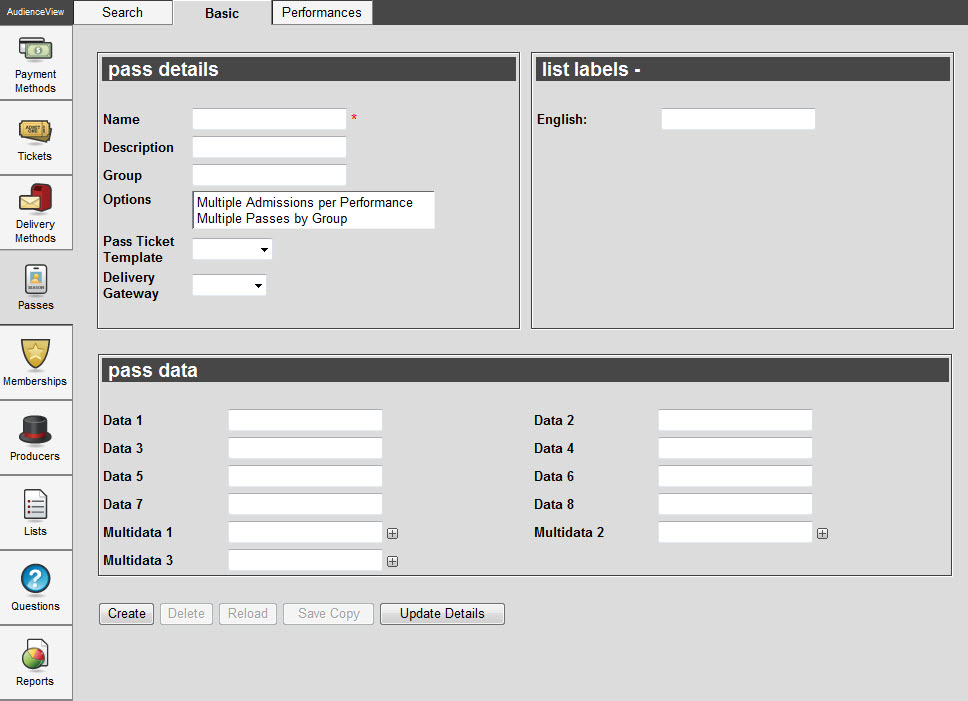
You can use the Passes|Basic page to create new passes, modify existing passes or delete existing passes.
The following image illustrates the General Configuration application Passes|Basic page:

The Passes|Basic Page
Pass Details Section
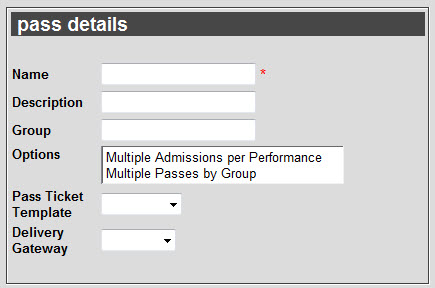
The following image illustrates the pass details section of the General Configuration application Passes|Basic page:

The pass details section of the General Configuration application Passes|Basic page contains the following properties:
| Field |
Description |
| Name |
Unique identifier for the pass. |
| Description |
A description of the pass. |
| Group |
Enables you to group this pass with other passes of the same group name. Use a group name in conjunction with Multiple Passes by Group if you intend to enable customers to carry multiple instances of the passes.
In certain scenarios (described below), if you create multiple passes within the same group, but do not enable the Multiple Passes by Group option for all group members, AudienceView will only allow a single instance of the pass for the customer.
In this scenario there are two passes, Pass A and Pass B. Both passes are a member of Group 1 but only Pass A is configured with the Multiple Passes by Group option. Customer X is to receive both passes. Based on this configuration, the ability to assign both Pass A and Pass B to the customer depends on the order in which the passes are assigned:
- If Pass A is assigned first to Customer X and then you attempt to assign Pass B to the same customer, the application will not allow you to assign Pass B by returning an error indicating that there already exists a pass within this group (e.g. Group X).
- If Pass B is assigned first to Customer X and then Pass A is assigned, no error will be returned. If Customer X is to receive multiple instances of Pass A and no instances of Pass B, no errors will be returned.
|
| Options |
Enables you to configure the pass to have multiple admissions:
- Multiple Passes by Group: Enables customers to hold multiple instances of the pass. Review the note above for information on restrictions if used with a Group.
- Multiple Admissions per Performance: Enables the pass to carry multiple admissions for the same performance. If not selected, only one admission for a performance can be assigned to the pass. If you do not select an option, customers will be limited to one pass instance and one admission per performance assigned to the pass.
If the pass is to be assigned with the purchase of the bundle, and the bundle is enabled for multiple admissions, you should also enable multiple admissions on the pass. This is especially true if the bundle is enabled for online sales. Since customers who purchase the bundle will not be able to remove their admissions from the pass, an error regarding multiple admissions on the pass will prevent the online customer from buying the bundle.
|
| Pass Ticket Template |
Template used when printing the pass. |
| Delivery Gateway |
If you integrate AudienceView with a third party access control system (e.g. Fortress) so that passes can be printed/scanned using the integrated system, select the appropriate option from the dropdown. |
Pass Data Section
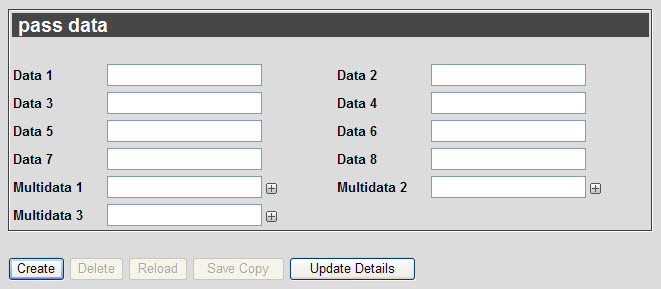
The following image illustrates the pass data section of the General Configuration application Passes|Basic page:

The pass data section of the General Configuration application Passes|Basic page contains the following properties:
| Field |
Description |
| Data [1-8] |
Enables you to store additional information specific to your organization.
Any data entered into these fields is searchable through Business Intelligence. To modify a data field label, navigate to the Registry::EN::Business Objects::TSpassBO::Pass node and select the appropriate field that you want to re-label. |
| Multidata [1-3] |
Enables you to store additional information specific to your organization. To add additional fields, click  or press CTRL+TAB once you have made an entry. or press CTRL+TAB once you have made an entry.
Any data entered into these fields is searchable through Business Intelligence. To modify a multidata field label, navigate to the Registry application Registry::EN::Business Objects::TSpassBO::Pass node and select the field that you want to re-label. |