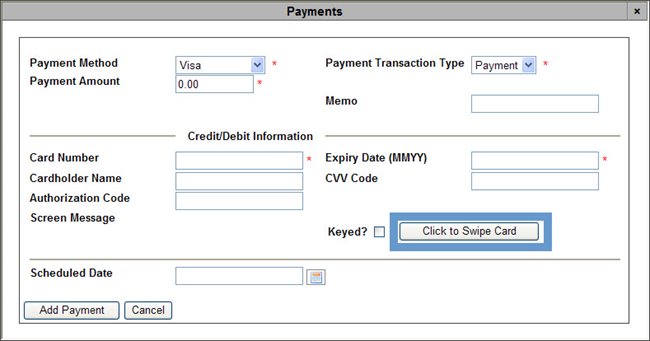
You can schedule a single payment using the Payments dialog box.
To schedule a single payment, complete the following:
-
Open the Customer Services application from the AudienceView Desktop.
-
Select the Order tab.
The Order|Search page appears.
-
Search for and select the order that you want to work with. For more information, refer to Searching for an Order.
The Order|Summary page appears.
-
Click 'Add Payment'.
The Payments dialog box appears.
-
Select the payment method, from the 'Payment Method' dropdown.
The Payments dialog box refreshes to display applicable information.

The default 'Payment Amount' is the amount owing on the order.
-
Verify the 'Payment Amount' and make any modifications, if required.
-
Add additional notes about the payment, using the 'Memo' field.
-
Complete the payment details. (Card swiping is not supported when scheduling payments prior to AudienceView 6.8.11 HotFix 5. EMV card swiping is not supported.)
For more information on specific payment methods, refer to:
-
Enter the date on which the payment is to occur, in the 'Scheduled Date' field (the 'Default Payment Due Date' field for Direct Debit) or click
 to select a date. For more information, refer to Using a Calendar to Add a Date.
-
Click 'Add Payment'.
The Payments dialog box closes, and the Order|Summary page becomes active. The unprocessed payment is added to the order.
-
Click 'Create' or 'Apply'.
The application indicates that the scheduled payments pay the order in full (if applicable). The Amount Due on the order reflects those payments processed.
-
Click 'OK'.
The 'Scheduled Payments' field in the Order Details section displays the scheduled payment amount and the Amount Due reflects the amount outstanding.