 |
Warning
Do not insert widgets within the form of an article. An error will cause the article to not appear Online. |
 |
Information
The Search Results Widgets can only be inserted into Body with Search articles. |
 |
Hint
A default image (e.g. your company logo) should be created and saved with the file name default-search-image.png in the AudienceView\UI\Online\Branding folder. When using the Search Results Widget - Align Horizontally and Search Results Widget - Align Vertically options, the 'Logo1' field entry is pulled from the sellable item and displayed in the search results. If an image was not added to the 'Logo1' field of a particular item, the default-search-image.png image will display instead. |
To build and insert the Search Results Widgets, complete the following:
- Open the Content Management application from the AudienceView Desktop.
- Select the Articles tab.
The Articles|Search page appears.
- Search for and select the article that you want to work with. For more information, refer to Content Management Articles-Search Page and Performing Searches.
The Articles|Basic page appears.
- Select the Text tab.
The Articles|Text page appears.
- Click 'Insert Widget'.
- Select the Search Results Widget that you want to insert from the dropdown:
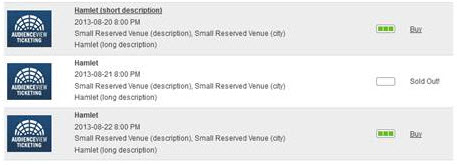
- Search Results Widget: This widget returns the default search results in the default format, and includes the short description, date and a Buy link.
For example:

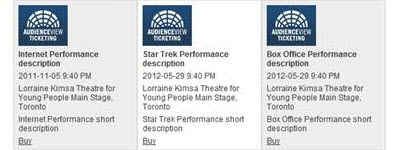
- Search Results Widget - Align Horizontally: This widget arranges the search results horizontally, and displays any information that was inserted into the 'Logo 1', 'Short Description', 'Start Date' and 'End Date', 'Venue Name', 'Venue City' fields as well as a Buy link.
For example:
- Search Results Widget - Align Vertically: This widget arranges the search results vertically, and displays any information that was inserted into the 'Logo 1', 'Short Description', 'Start Date' and 'End Date', 'Venue Name', 'Venue City' fields as well as a Buy link.
For example:
The Search Results Widget dialog box appears:
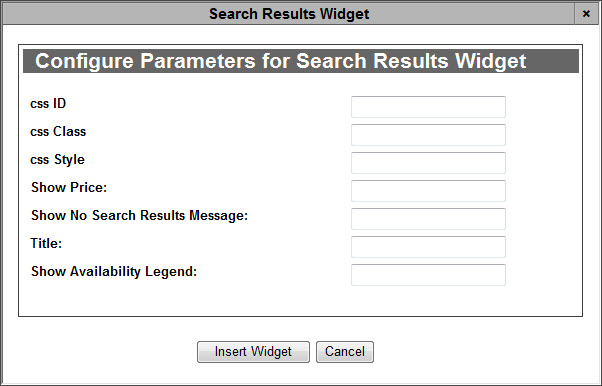
- Complete the following fields:
- css Class: Enter any applicable CSS class information (with no spaces) in this field.
- css Style: Enter any applicable CSS styles that you want to apply to the video widget (e.g. background:blue,color:white).
- css ID: Enter any applicable CSS ID information (with no spaces) in this field.
For more information, refer to AudienceView Branding Guide.
- Show Price: Enter true in the field to display the show's pricing. If the field is left blank, the price will not appear.
- Show No Search Results Message: Enter true in the field to display the No Search Results message when the search does not return any results. If the field is left blank, the message will not appear.
- Title: Enter the name for the search widget that you want to appear Online.
- Show Availability Legend: Enter true in the field to display the availability legend. If the field is left blank, the legend will not appear.
For more information, refer to Online Seat Availability Indicators.
- Click 'Insert Widget'.
The search widget is inserted in the article text.
- Click 'Apply'
A window confirms that the application updated the article.
- Click 'OK'.
|
Hint
To change any of the labels that appear in the Configure Parameters for Search Results Widget dialog box, navigate to the applicable Registry application Registry::EN::Application::Content Management::Widgets::
- Search Results Widget node
- Search Results Widget - Align Horzontally node
- Search Results Widget - Align Vertically node
|