 | Warning
Do not insert widgets within the form of an article. An error will cause the article to not appear Online. |
 | Hint
If you have not yet published a Facebook page or you have placesd demographic restrictions on the page (e.g. a specific country, age of majority, legal drinking age) the Like button will not display if users are not logged into Facebook. |
Before you can insert the Facebook Like button to a site or article, you must register your website with Facebook, and enable the Facebook Like button in the Content Management application Sites|Applications page. For more information, refer to Enabling the Facebook Like Button.
To build and insert the Facebook Like Button Widget, complete the following:
- Open the Content Management application from the AudienceView Desktop.
- Select the Articles tab.
The Articles|Search page appears.
- Search for and select the article that you want to work with. For more information, refer to Content Management Articles-Search Page and Performing Searches.
The Articles|Basic page appears.
- Select the Text tab.
The Articles|Text page appears.
- Click 'Insert Widget'.
- Select Facebook Like Button Widget from the dropdown.
The Facebook Like Button Widget dialog box appears:
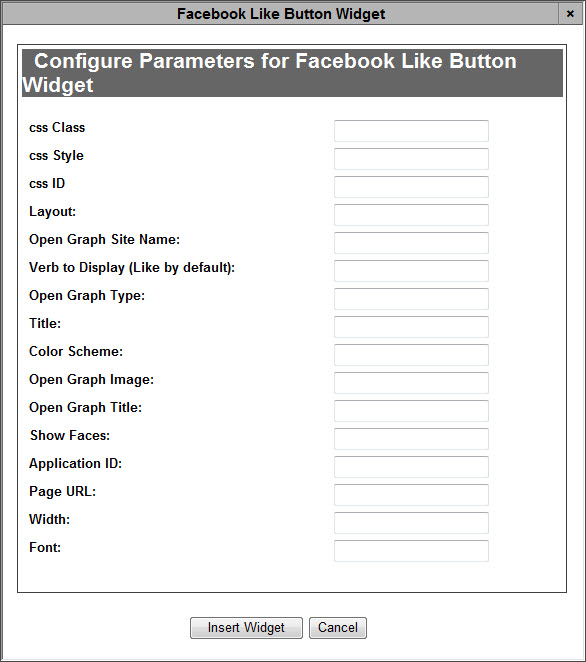
- Complete the following fields:
- css Class: Enter any applicable CSS class information (with no spaces) in this field.
- css ID: Enter any applicable CSS ID information (with no spaces) in this field.
- css Style: Enter any applicable CSS styles that you want to apply to the Facebook Like Button widget (e.g. background:blue,color:white).
For more information, refer to AudienceView Branding Guide.
- Layout: Enter the layout option that you want to use. There are three options:
- Standard: Displays social text to the right of the button and friends' profile photos below.
- Minimum width: 225 pixels.
- Default width: 450 pixels.
- Height: 35 pixels (without photos) or 80 pixels (with photos).
- button_count: Displays the total number of time the button was clicked to the right of the button.
- Minimum width: 90 pixels
- Default width: 90 pixels
- Height: 20 pixels
- show_faces: Displays the total number of time the button was clicked above the button.
- Minimum width: 55 pixels
- Default width: 55 pixels
- Height: 65 pixels
- Open Graph Site Name: Currently not in use.
- Verb to Display (Like by Default): Enter the text that you want to be displayed within the button. By default, the button displays Like.
- Open Graph Type: Currently not in use.
- Title: Enter the name for the Facebook Like Button that you want to appear.
- Color Scheme: Enter the colour scheme that you want to use for the button. There are two options:
- Open Graph Image: Currently not in use.
- Open Graph Title: Currently not in use.
- Show Faces: Specifies whether to display profile photos below the button (standard layout only)
- Application ID: Enter the 'App ID' that you received when you registered your site with Facebook.
- Page URL: Enter/paste the URL of the page that you want to the button to refer to.
- Width: The width of the button defined in pixels.
- Font: Enter the font that you want the text on the button to appear in. There are six options:
- Arial
- Lucida Grande
- Segoe UI
- Tahoma
- Trebuchet MS
- Verdana
- Click 'Insert Widget'.
The Facebook Button widget is inserted in the article text.
- Click 'Apply'
A window confirms that the application updated the article.
- Click 'OK'.
| Hint
To change any of the labels that appear in the Configure Parameters for Facebook Like Button Widget dialog box, navigate to the Registry application Registry::EN::Application::Content Management::Widgets::Facebook Like Button Widget node. |