You can insert tabular information into an article.
To insert a table in a article, complete the following:
- Open the Content Management application from the AudienceView Desktop.
- Select the Articles tab.
The Articles|Search page appears.
- Search for and select the article that you want to work with. For more information, refer to the Content Management Articles-Search Page and Performing Searches.
The Articles|Basic page appears.
- Select the Text tab.
The Articles|Text page appears.
- Place the cursor at the point in the article where you want to insert the table.
- Click on the Table icon (
 ).
).
The Table Properties lightbox appears.
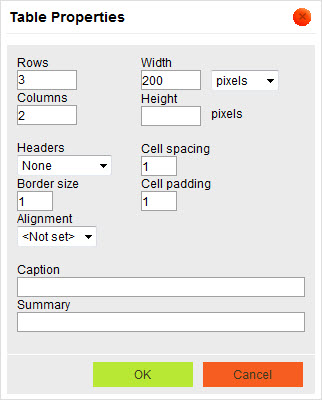
- Enter the number of table rows in the 'Rows' field.
- Enter the number of table columns in the 'Columns' field.
- Select the column and/or row headers in the 'Headers' dropdown.
- Enter the border size for the table in the 'Border size' field. If you do not want to have a border on the table, enter 0.
- Select the alignment for the table in the 'Alignment' dropdown.
- To enter the width of the table:
- Select the number of pixels wide you would like for the table by entering the numeric value in the first 'Width' field and selecting pixels from the dropdown
OR
- Select the percentage of the article width you would like for the table by entering a percentage (1 - 100) in the first 'Width' field and selecting percent from the dropdown.
- Enter the height for the table in pixels in the 'Height' field.
- Enter the cell spacing value to increase or decrease the width of the table lines between the cells in the 'Cell spacing' field.
- Enter the cell padding value to increase or decrease the space inside the table cells in the 'Cell padding' field.
- Enter the title header for the table in the 'Caption' field.
- Enter the summary describing the table in the 'Summary' field.
- Click 'OK'.
The Articles|Text page displays with the table displayed in the article.