Browser (Client) printing allows you to print tickets, receipts and reports to a local or local network printer. No network path from the AudienceView server to the printer is required. This feature uses a small Java applet that is automatically installed on the first use of the feature. Client printing supports items in FGL2, FGL4 and PDF formats.
 |
Hint
Before using a browser (Client) printer, visit http://java.com/verify to ensure that you have the latest version of Java installed on your device.
If there is an update to Java after completing this process, you will be prompted to updated it when you attempt to print an order. If this occurs, the order will need to be printed again. |
To use a local, browser-based printer to print items, complete the following:
-
Connect the printer to your device, and install it locally following the printer's installation instructions.
-
Open the Application Security application from the AudienceView Desktop.
The Group|Search page appears.
-
Search for and select the group that you want to enable content for. For more information, refer to Application Security - Group|Search Page and Performing Searches.
The Group|Basic page appears.
-
Select the Content tab.
The Group|Content page appears.
-
Select the System property.
-
Select the Client Printing property.
-
Click 'Apply'.
A window confirms the application updated the group.
-
Click 'OK'.
A window confirms that the application updated the group.
-
Open the Registry application from the AudienceView Desktop.
-
Navigate to the System::Configuration::Printers node.
-
Click 'New Node'.
-
Enter the name of the printer in the 'Node Name' field.
-
Select Client Printer from the 'Type' dropdown.
-
Select the type of printer that you are using from the 'Device' dropdown:
-
FGL2
-
FGL4
-
PDF (if you select PDF, ensure that you set the 'DPI' to 72)
-
Enter the exact name of printer as it appears in the Devices and Printers section of your local computer in the 'Queue' field.
-
Click 'Apply'.
A window confirms that the application updated the Registry.
-
Click 'OK'.
-
If you are a self-hosted client, the following MIME Type needs to be added to IIS:
-
File name extension = .jnlp
-
MIME type = application/x-java-jnlp-file
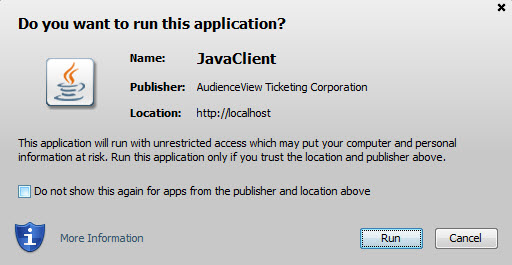
The first time that you use the browser (Client) printer from your device/web browser, the following message will appear:

Select the check box and click 'Run'.
 |
Hint
Browser (Client) printing works well for small- and medium-sized print jobs. You may experience issues printing larger jobs because of the larger file sizes. If you are experiencing issues we suggest breaking your print job into batches of 1,000 orders. |
 |
Caution
The following printing types are not currently supported by browser (Client) printing:
-
Scheduled printing
-
Kiosk printing
-
POS printing
-
Ticket templates with a 'Device Type' of Windows. They must be updated to PDF
|