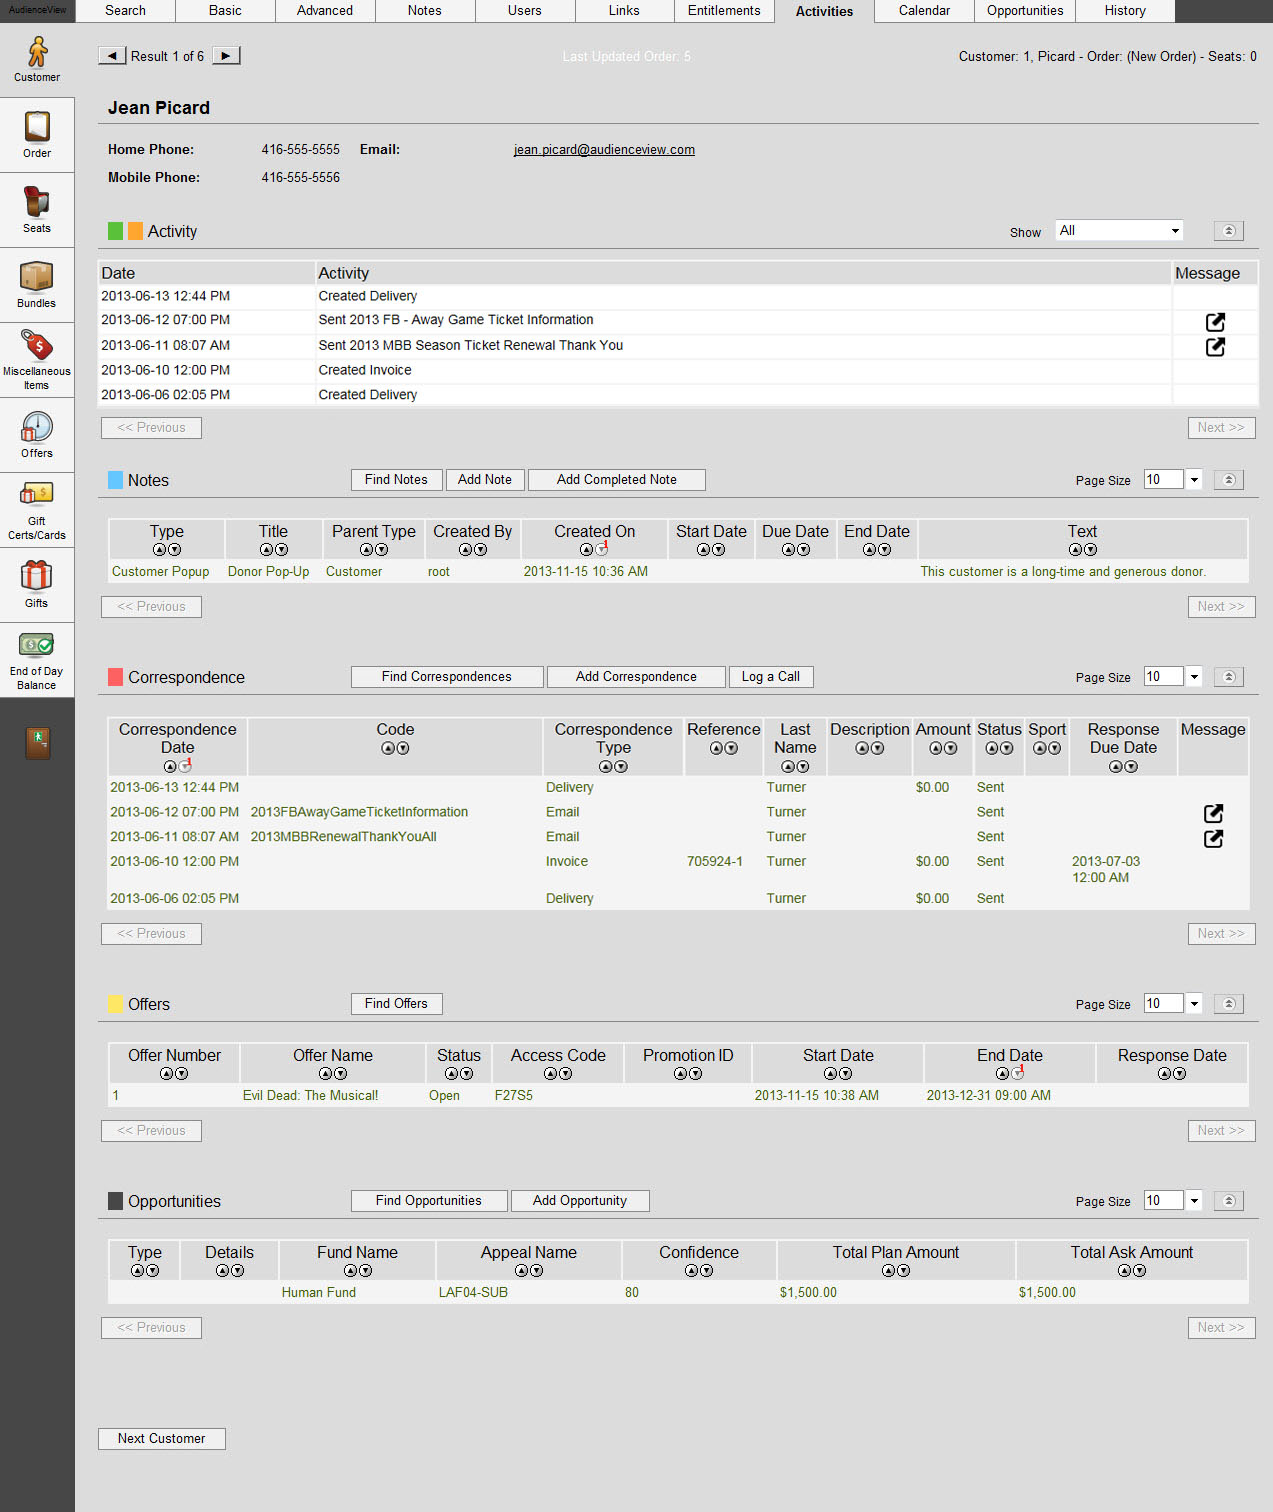
The Customer Services application Customer|Activities page allows you to see all of the interactions that have taken place with a customer in a single view.
The following image illustrates the Customer Services application Customer|Activities page:
Customer Contact Section
The Customer Contact section of the Customer Services application Customer|Activities page displays all of the phone numbers and email address associated with the customer account (entered in the phone & email sections of the Customer|Basic and Customer|Advanced pages).
The following image illustrates the Customer Contact section of the Customer Services application Customer|Activities page:

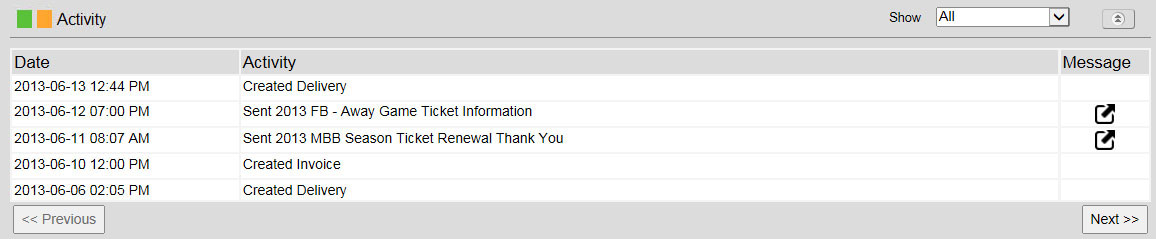
Activity Section
The Activity section of the Customer Services application Customer|Activities page displays all of the correspondence that has taken place with the customer. There are two types of correspondence displayed:
- With a Message: The correspondence was created via the Correspondence application (i.e. email or internal messages). The following information is displayed:
- When the correspondence was sent
- If the correspondence failed
- When the customer clicked-through a link in the correspondence
- When an order is completed as the result of a click-through
- If the customer has unsubscribed from a mailing list
Clicking  in the 'Message' column will open a read-only version of the message that was sent.
- Without a Message: The correspondence was not created via the Correspondence application, but the interaction still generates a correspondence record (e.g. offers and invoices). These will be displayed as Created followed by the type of correspondence that was generated (e.g. Delivery, Forwarding, Reservation, CancelTickets, Offer or Invoice).
While you cannot search for specific activities, you can filter the list using the 'Show' dropdown:
- All: Displays all of the activities that have taken place with the customer.
- With Messages: Displays only those activities that were generated via messages (i.e. the Correspondence application).
- Without Messages: Displays only those activities that were not generated via messages (e.g. offers and invoices).
The following image illustrates the Notes section of the Customer Services application Customer|Activities page:
Notes Section
The Notes section of the Customer Services application Customer|Activities page displays all of the customer notes. Order notes are not displayed on the Customer|Activities
The following image illustrates the Notes section of the Customer Services application Customer|Activities page:

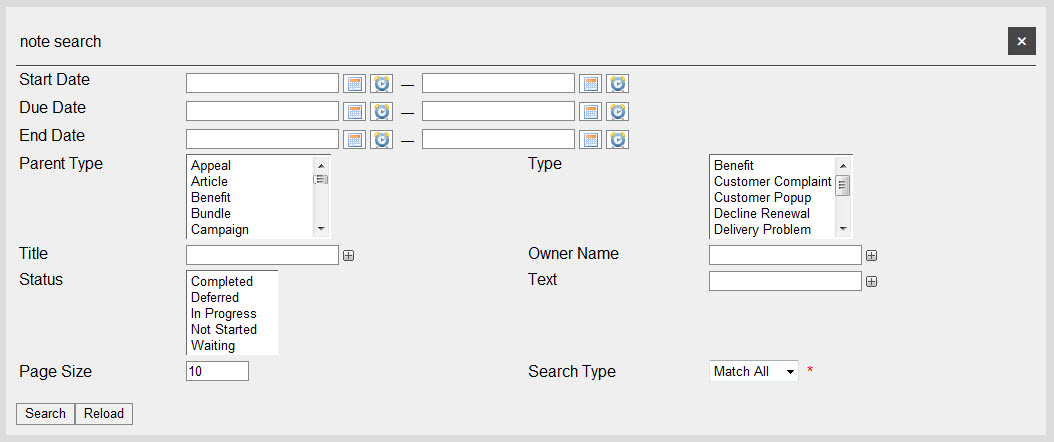
Note Search Section
When the 'Find Notes' button is clicked the note search section expands, allowing you to search for and select particular customer notes.
The following image illustrates the note search section of the Customer Services application Customer|Activities page:
The note search section of Customer Services application Customer|Activities page contains the following properties:
| Field |
Description |
| Start Date |
Enables you to filter the search based on a range of start dates.
Enter the date or relative date in the field or click  or or  to select a date or relative date. to select a date or relative date.
For more information, refer to Using the Calendar to Select a Date and Using Relative Dates and Times. |
| Due Date |
Enables you to filter the search based on a range of due dates.
Enter the date or relative date in the field or click or to select a date or relative date.
For more information, refer to Using the Calendar to Select a Date and Using Relative Dates and Times. |
| End Date |
Enables you to filter the search based on a range of end dates.
Enter the date or relative date in the field or click or to select a date or relative date.
For more information, refer to Using the Calendar to Select a Date and Using Relative Dates and Times. |
| Parent Type |
This field is not currently in use.
Enables you to filter the search based on the type of note (e.g an order note or a customer note).
To select more than one parent type, hold CTRL or SHIFT while making your selections. |
| Type |
Enables you to filter the search based on the type of note (e.g. Customer Complaint, General Comment).
If the note is associated with a volunteer shift,the entry for the 'Type' field will display in the date entry of the Customer|Calendar page. All displayed notes are sorted by this field.
When the Customer Popup option is selected, the information contained in the 'Message' field will appear in a pop-up whenever the customer account is loaded, or added to an order using the radio buttons in the Desktop. Customer Popup messages do not appear in AudienceView Online. |
| Title |
Enables you to filter the search based on the user-defined name for the task.
To add additional fields, click  or press CTRL+TAB once you have made an entry. or press CTRL+TAB once you have made an entry. |
| Owner Name |
Enables you to filter the search based on the user name(s) of those responsible for the note or task.
To add additional fields, click or press CTRL+TAB once you have made an entry. |
| Status |
Enables you to filter the search based on the current status of the note (e.g. Not Started, In Progress, Waiting, Deferred, Completed).
To select more than one status, hold CTRL or SHIFT while making your selections. |
| Text |
Enables you to filter the search based on the portions of the body text of the note.
To add additional fields, click or press CTRL+TAB once you have made an entry. |
| Page Size |
Enables you to specify the number of records to display per page returned in the results. |
| Search Type |
Enables you to choose the appropriate type of matches that you are expecting:
- Match Any: When you want to search for records containing one or more of the search terms you selected.
- Match All: When you want to search for records that contain all of the search terms you selected.
|
Other searches can be created using the Business Intelligence and Reports application. For more information, refer to Business Intelligence and Reports - Business Intelligence. The new search would then be defined in the 'Default Customer Activities Correspondence Search' available in the Registry application System::Configuration::Preferences node, the Application Security application User|Preferences or the Roles|Preferences pages.
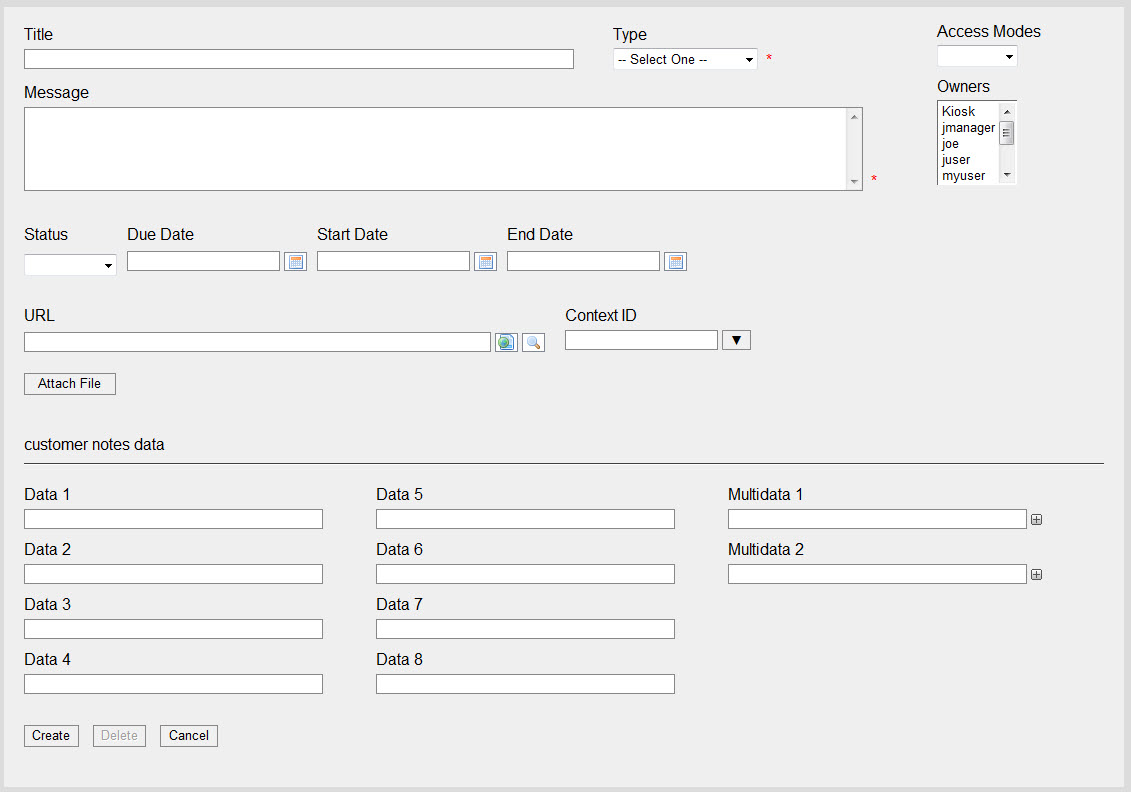
Add and Edit Notes Section
When 'Add Notes is clicked or a note row is selected the add note section expands, allowing you to add/edit customer notes on the account. Notes can also be added via the Customer|Notes page.
When 'Add Completed Note' is clicked the same section expands except the 'Status' dropdown is set to Complete and the 'Due Date', 'Start Date' and 'End Date' fields are populated with the current date and time.
The following image illustrates the add note section of the Customer Services application Customer|Activities page:
The add note section of Customer Services application Customer|Activities page contains the following properties:
| Field |
Description |
| Title |
A user-defined name for a task that may be the context of the note. |
| Type |
The type of note (e.g. Customer Complaint, General Comment). If the note is associated with a volunteer shift,the entry for the 'Type' field will display in the date entry of the Customer|Calendar page. All displayed notes are sorted by this field.
When the Customer Popup option is selected, the information contained in the 'Message' field will appear in a pop-up whenever the customer account is loaded, or added to an order using the radio buttons in the Desktop. Customer Popup messages do not appear in AudienceView Online. |
| Access Mode |
The access level of the note:
- Public: All users can view and update the note.
- Private: Only the user creating the note will be able to view and update the note.
- Readable: All users can view the note, but only the user creating the note will be able to update the note.
|
| Message |
The body of the note. |
| Owners |
The user(s) responsible for the note or task. |
| Status |
The current status of the note (e.g. Not Started, In Progress, Waiting, Deferred, Completed). |
| Due Date |
The date the task of the note must be completed.
Enter a date into the field or click to select the date.
For more information, refer to Using the Calendar to Select a Date. |
| Start Date |
The date the work on the task associated with the note commenced. You are also able to use this field to indicate the start time for volunteer shifts. If the note is associated with a volunteer shift,the entry for the 'Start Date' field will display in the date entry of the Customer|Calendar page.
Enter a date into the field or click to select the date.
For more information, refer to Using the Calendar to Select a Date. |
| End Date |
The date the work on the task associated with the note ended. You are also able to use this field to indicate the stop time for volunteer shifts. This field and the 'Start Date' field will be used to calculate the duration of the volunteer shift displayed on the Customer|Calendar page.
Enter a date into the field or click to select the date.
For more information, refer to Using the Calendar to Select a Date. |
| URL |
A website URL that may be relevant to the note.
Clicking  launches an internet browser to the website currently in the 'URL' field. launches an internet browser to the website currently in the 'URL' field. |
| Context ID |
Provides a business context for the note. You are able to select a business item category (e.g. Appeal, Order, Performance) and then search for a specific business item to which the note would be associated. For instance, regarding issues with a particular order, you can provide the context of the order to the note. Selecting a context of a specific performance will display selected details of the note in the Customer|Calendar page for volunteer management.
Click  to expand the dropdown and select the type of business item. Use the find dialog box that appears to locate and select the specific business item. to expand the dropdown and select the type of business item. Use the find dialog box that appears to locate and select the specific business item.
For more information, refer to Performing Searches or The Find Dialog Boxes. |
| Attachment File |
Allows you to attach a files to the note. |
| Data [1-8] |
Enables you to store additional information specific to your organization.
Any data entered into these fields is searchable through Business Intelligence. To modify a data field label, navigate to the Registry application Registry::EN::Business Objects::TSnotesBO::Notes node and select the field that you want to re-label. |
| Multidata [1-2] |
Enables you to store additional information specific to your organization. To add additional fields, click or press CTRL+TAB once you have made an entry.
Any data entered into these fields is searchable through Business Intelligence. To modify a multidata field label, navigate to the Registry application Registry::EN::Business Objects::TSnotesBO::Notes node and select the field that you want to re-label. |
Correspondence Section
The Correspondence section of the Customer Services application Customer|Activities page displays all of the customer correspondence.
The following image illustrates the Correspondence section of the Customer Services application Customer|Activities page:
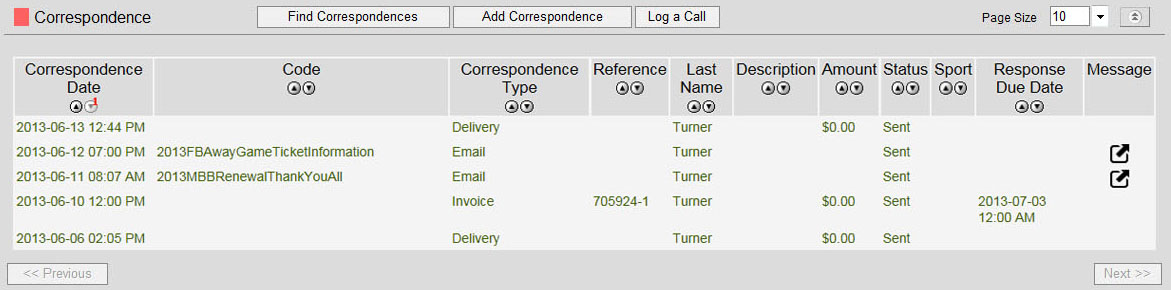
Clicking on a correspondence row will open the add/edit correspondence section.
Clicking in the 'Message' column will open a read-only version of the message that was sent.
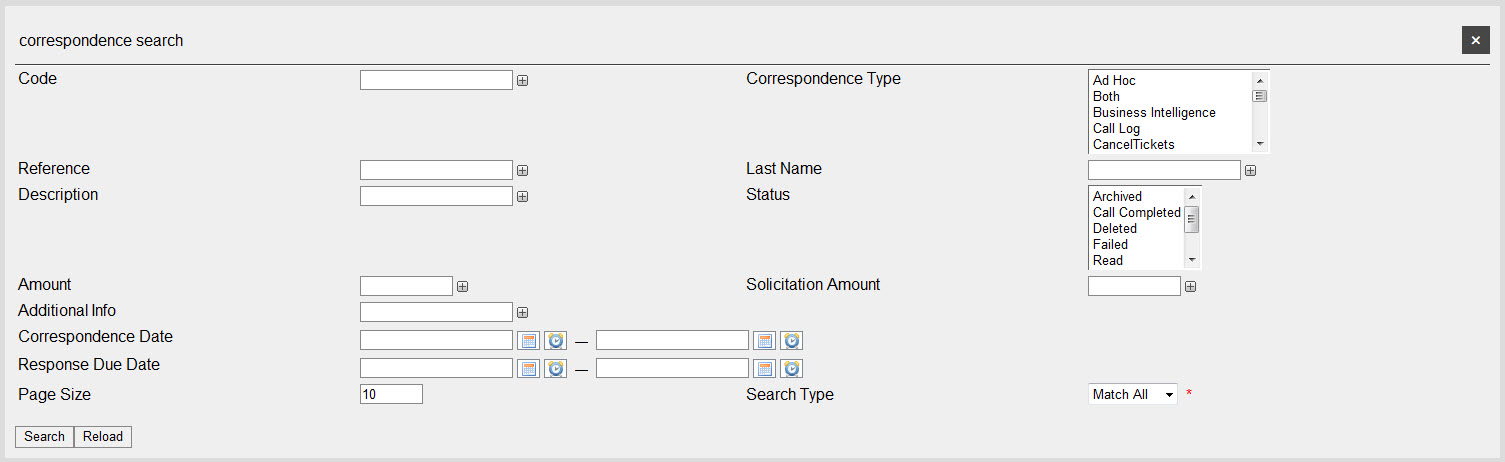
Correspondence Search Section
When the 'Find Correspondence' button is clicked the correspondence search section expands, allowing you to search for and select a particular customer correspondence.
The following image illustrates the correspondence search section of the Customer Services application Customer|Activities page:
The correspondence search section of Customer Services application Customer|Activities page contains the following properties:
| Field |
Description |
| Code |
Enables you to filter the search based on those messages with the specified correspondence number.
To add additional fields, click or press CTRL+TAB once you have made an entry. |
| Correspondence Type |
Enables you to filter the search based on the correspondence type:
- Ad Hoc: Correspondence that was created and sent to customers ad hoc via the Customer Services application Customer|History|Correspondence page.
- Both: Tax receipt and thank you letter correspodence that was sent as two separate communications.
- Business Intelligence: Correspondence that was created and sent to customers via the Business Intelligence and Reports application.
- CancelTickets: Correspondence that was created and sent to customers via the Utilities application Print|Order Print page when a ticket has been cancelled.
- Combined: Correspondence that was sent as a combined tax receipt and thank you letter.
- Delivery: Correspondence (i.e. tickets) that was created and sent to customers who selected Download or Email as a delivery method for their orders.
- Email: Correspondence that was created and sent to customers via the Correspondence application Messages pages.
- Forwarding: Correspondence that was sent as a result of a ticket(s) being forwarded online.
- Gift: Correspondence that was created and sent as a result of a donation (i.e. a thank you letter) via the Utilities application Pledges|Thank You Letters page.
- Invoice: Correspondence that was created and sent to customers via the Utilities application Orders|Order Invoice page.
- Message: Correspondence that was sent via the Correspondence application.
- Offer: Correspondence that was created when customers renew orders/offers.
- Referrer: Correspondence that was created and sent as a result of a donation (i.e. a thank you letter) that was made by someone who was referred by the addressed customer via the Utilities application Pledges|Thank You Letters page.
- Tax Receipt (normal): Correspondence that was created and sent as a result of donation (i.e. a tax receipt) via the Utilities application Pledges|Tax Receipts page.
- Tax Receipt (TaxRecipient): Correspondence that was created and sent as a result of donation (i.e. a tax receipt) via the Utilities application Pledges|Tax Receipts page.
- Thank You Letter: Correspondence that was created and sent as a result of a donation via the Utilities application Pledges|Thank You Letters page.
To select more than one correspondence type, hold CTRL or SHIFT while making your selections.
|
| Reference |
Enables you to filter the search based on the correspondence reference.
To add additional fields, click or press CTRL+TAB once you have made an entry. |
| Description |
Enables you to filter the search based on the description of the correspondence.
To add additional fields, click or press CTRL+TAB once you have made an entry. |
| Status |
Enables you to filter the search based the status of the correspondence.
To select more than one status, hold CTRL or SHIFT while making your selections. |
| Amount |
Enables you to filter the search based on the monetary transaction amount of the correspondence.
To add additional fields, click or press CTRL+TAB once you have made an entry. |
| Solicitation Amount |
Enables you to filter the search based on the amount of money that the correspondence was soliciting.
To add additional fields, click or press CTRL+TAB once you have made an entry. |
| Additional Info |
Enables you to filter the search based on any additional information that might have been included with the original correspondence. |
| Correspondence Date |
Enables you to filter the search based on the date that the correspondence was sent within the specified date range.
Enter the date or relative date in the field or click or to select a date or relative date.
For more information, refer to Using the Calendar to Select a Date and Using Relative Dates and Times. |
| Response Due Date |
Enables you to filter the search based on the date that the response to the original correspondence was due by within the specified date range.
Enter the date or relative date in the field or click or to select a date or relative date.
For more information, refer to Using the Calendar to Select a Date and Using Relative Dates and Times. |
| Page Size |
Enables you to specify the number of records to display per page returned in the results. |
| Search Type |
Enables you to choose the appropriate type of matches you are expecting:
- Match Any: When you want to search for records containing one or more of the search terms you selected.
- Match All: When you want to search for records that contain all the search terms you selected.
|
Other searches can be created using the Business Intelligence and Reports application. For more information, refer to Business Intelligence and Reports - Business Intelligence. The new search would then be defined in the 'Default Customer Activities Note Search' available in the Registry application System::Configuration::Preferences node, the Application Security application User|Preferences or the Roles|Preferences pages.
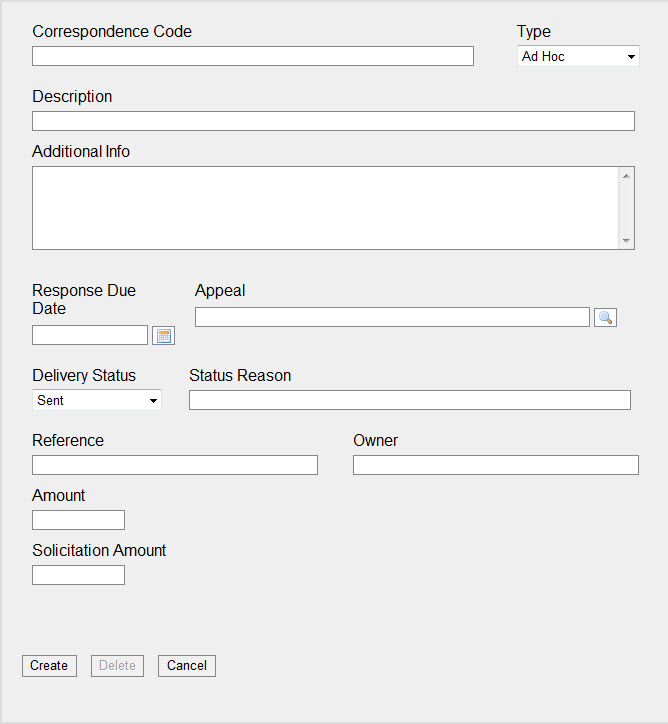
Add and Edit Correspondence Section
When 'Add Correspondence' is clicked or a correspondence row selected the add correspondence section expands, allowing you to add information regarding correspondence that has taken place.
When 'Log a Call' is clicked the same section expands except the 'Type' dropdown is set to Call Log and the 'Delivery Status' is set to Call Completed.
The following image illustrates the add note section of the Customer Services application Customer|Activities page:
The add correspondence section of Customer Services application Customer|Activities page contains the following properties:
| Field |
Description |
| Code |
Enter the code that you want tag against any action that a customer saves to the database through the correspondence.
For more information, refer to Referrer Codes. |
| Correspondence Type |
Select the correspondence type:
- Ad Hoc: Correspondence that was created and sent to customers ad hoc via the Customer Services application Customer|History|Correspondence page.
- Both: Tax receipt and thank you letter correspodence that was sent as two separate communications.
- Business Intelligence: Correspondence that was created and sent to customers via the Business Intelligence and Reports application.
- CancelTickets: Correspondence that was created and sent to customers via the Utilities application Print|Order Print page when a ticket has been cancelled.
- Combined: Correspondence that was sent as a combined tax receipt and thank you letter.
- Delivery: Correspondence (i.e. tickets) that was created and sent to customers who selected Download or Email as a delivery method for their orders.
- Email: Correspondence that was created and sent to customers via the Correspondence application Messages pages.
- Forwarding: Correspondence that was sent as a result of a ticket(s) being forwarded online.
- Gift: Correspondence that was created and sent as a result of a donation (i.e. a thank you letter) via the Utilities application Pledges|Thank You Letters page.
- Invoice: Correspondence that was created and sent to customers via the Utilities application Orders|Order Invoice page.
- Message: Correspondence that was sent via the Correspondence application.
- Offer: Correspondence that was created when customers renew orders/offers.
- Referrer: Correspondence that was created and sent as a result of a donation (i.e. a thank you letter) that was made by someone who was referred by the addressed customer via the Utilities application Pledges|Thank You Letters page.
- Tax Receipt (normal): Correspondence that was created and sent as a result of donation (i.e. a tax receipt) via the Utilities application Pledges|Tax Receipts page.
- Tax Receipt (TaxRecipient): Correspondence that was created and sent as a result of donation (i.e. a tax receipt) via the Utilities application Pledges|Tax Receipts page.
- Thank You Letter: Correspondence that was created and sent as a result of a donation via the Utilities application Pledges|Thank You Letters page.
|
| Description |
Enter the description of the correspondence. |
| Additional Info |
Enter any additional information that might be relevant to the correspondence. |
| Response Due Date |
Enter the date in which a response is due.
Enter the date in the field or click to select a date .
For more information, refer to Using the Calendar to Select a Date. |
| Appeal |
Enter the name of the appeal associated with the correspondence |
| Delivery Status |
Optionally, select a delivery status for the correspondence. |
| Status Reason |
Enter a reason for the option selected from the 'Delivery Status' dropdown. |
| Reference |
Optionally, enter the name of the customer who referred you to the person that the correspondence is associated with. |
| Owner |
Optinally, enter the name of the person who owns the correspondence. |
| Amount |
Enter the monetary amount that was received as a result of the correspondence. |
| Solicitation Amount |
Enter the amount of money that you are soliciting for. |
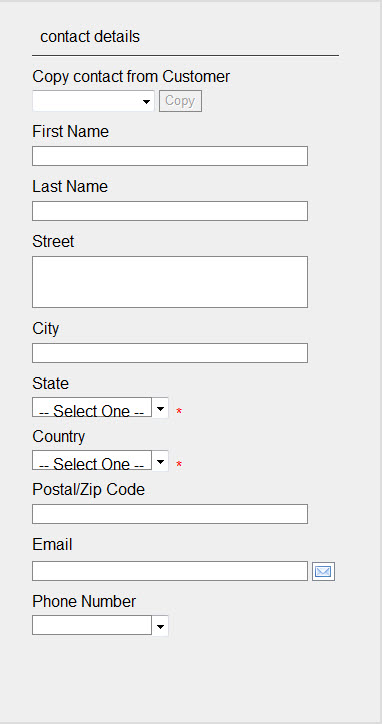
Correspondence Contact Details Section
The correspondence contact details section of the allows you to enter the contact information of the customer.
The main customer account and any contact associated with the account appear in the 'Copy Contact From Customer' dropdown. Selecting a contact and clicking 'Copy' will populate the correspondence contact detail fields with the information that is pertinent to the selected contact.
These fields can also be entered/updated manually. Changes made to this section do not get applied to the information contained on the Customer|Basic or Customer|Advanced pages.
The following image illustrates the correspondence contact details section of the Customer Services application Customer|Activities page:
Offers Section
The Offers section of the Customer Services application Customer|Activities page displays all of the customer's offers.
The following image illustrates the Offers section of the Customer Services application Customer|Activities page:

Offers Search Section
When the 'Find Offers' button is clicked the offers search section expands, allowing you to search for and select particular customer offers.
When an offer is selected, you are redirected to the Customer Services application Offer|Summary page.
The following image illustrates the offers search section of the Customer Services application Customer|Activities page:
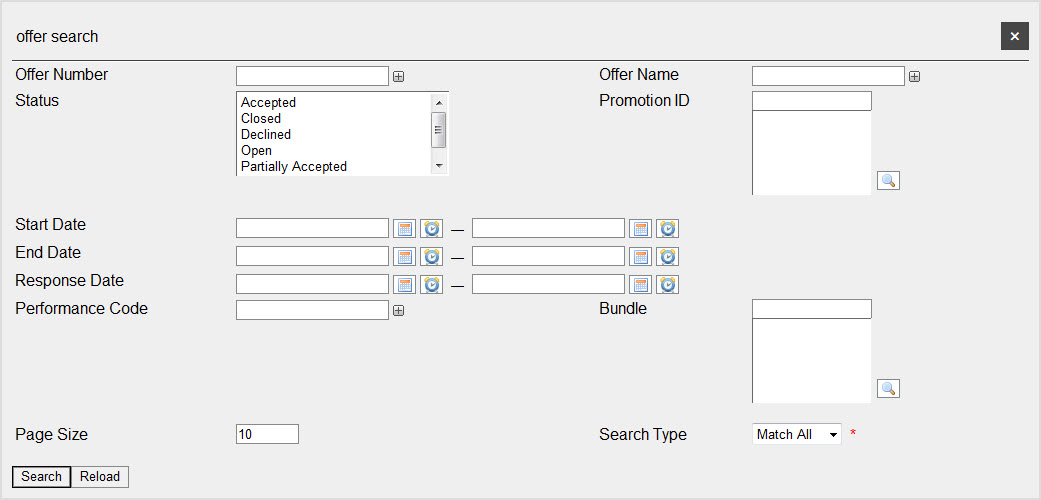
The offer search section of Customer Services application Customer|Activities page contains the following properties:
| Field |
Description |
| Offer Number |
Enables you to filter the search based on the offer number for the desired offer.
To add additional fields, click or press CTRL+TAB once you have made an entry. |
| Offer Name |
Enables you to filter the search based on the name of the offer.
To add additional fields, click or press CTRL+TAB once you have made an entry. |
| Status |
Enables you to filter the search based on the status of the offer:
- Accepted
- Closed
- Declined
- Open
- Partially Accepted
- Partially Accepted and Declined
To select more than one status, hold CTRL or SHIFT while making your selections.
|
| Promotional ID |
Enables you to filter the search based on the promotion associated to the offer.
Enter the Promotional ID or click  to search for a promotion. to search for a promotion.
For more information, refer to The Find Promotion Codes Dialog Box. |
| Start Date |
Enables you to filter the search based on a range of dates/times that the offer was created on.
Enter a date or relative date into the field or click or to select the date or relative date.
For more information, refer to Using the Calendar to Select a Date and Using Relative Dates and Times. |
| End Date |
Enables you to filter the search based on a range of dates/times on which the offer will expire.
Enter a date or relative date into the field or click or to select the date or relative date.
For more information, refer to Using the Calendar to Select a Date and Using Relative Dates and Times. |
| Response Date |
Enables you to filter the search based on the date and time that a response to the offer was received.
Enter a date or relative date into the field or click or to select the date or relative date.
For more information, refer to Using the Calendar to Select a Date and Using Relative Dates and Times. |
| Performance Code |
Enables you to filter the search based on the performance code that is associated to the offer, if available.
To add additional fields, click or press CTRL+TAB once you have made an entry. |
| Bundle |
Enables you to filter the search based on the name of the bundle associated to the offer, if available.
Enter the bundle name or click to search for the bundle.
For more information, refer to The Find Bundles Dialog Box. |
| Page Size |
Enables you to specify the number of records to display per page returned in the results. |
| Search Type |
Enables you to choose the appropriate type of matches that you are expecting:
- Match Any: When you want to search for records containing one or more of the search terms you selected.
- Match All: When you want to search for records that contain all of the search terms you selected.
|
Other searches can be created using the Business Intelligence and Reports application. For more information, refer to Business Intelligence and Reports - Business Intelligence. The new search would then be defined in the 'Default Customer Activities Offer Search' available in the Registry application System::Configuration::Preferences node, the Application Security application User|Preferences or the Roles|Preferences pages.
Opportunities Section
The Opportunities section of the Customer Services application Customer|Activities page displays all of the customer's offers.
The following image illustrates the Opportunities section of the Customer Services application Customer|Activities page:

Opportunities Search Section
When the 'Find Opportunities' button is clicked the offers search section expands, allowing you to search for and select particular customer opportunities.
The following image illustrates the opportunities search section of the Customer Services application Customer|Activities page:

The opportunities search section of Customer Services application Customer|Activities page contains the following properties:
| Field |
Description |
| Type |
Enables you to filter the search based on the categorization of the opportunity.
To add additional fields, click or press CTRL+TAB once you have made an entry. |
| Details |
Enables you to filter the search based on the details of the opportunity.
To add additional fields, click or press CTRL+TAB once you have made an entry. |
| Fund Name |
Enables you to filter the search based on the name of the fund.
To add additional fields, click or press CTRL+TAB once you have made an entry. |
| Appeal Name |
Enables you to filter the search based on the name of the appeal
To add additional fields, click or press CTRL+TAB once you have made an entry. |
| Page Size |
Enables you to specify the number of records to display per page returned in the results. |
| Search Type |
Enables you to choose the appropriate type of matches that you are expecting:
- Match Any: When you want to search for records containing one or more of the search terms you selected.
- Match All: When you want to search for records that contain all of the search terms you selected.
|
Other searches can be created using the Business Intelligence and Reports application. For more information, refer to Business Intelligence and Reports - Business Intelligence. The new search would then be defined in the 'Default Customer Activities Opportunity Search' available in the Registry application System::Configuration::Preferences node, the Application Security application User|Preferences or the Roles|Preferences pages.
Customer Opportunities Section
The following image illustrates the customer opportunity section of the Customer Services application Customer|Activities page:
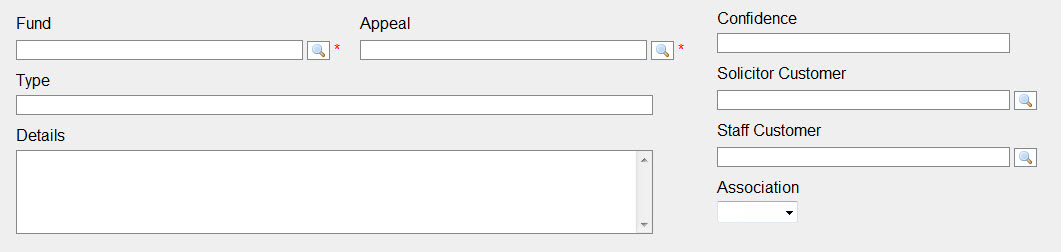
The customer opportunity section of the Customer Services application Customer|Activities page contains the following properties:
| Field |
Description |
| Fund |
Enter the name of the fund that you want to apply the opportunity to or click to search for it.
For more information, refer to The Find Funds Dialog Box. |
| Appeals |
Enter the name of the appeal that you want to apply the opportunity to or click to search for it.
For more information, refer to The Find Appeals Dialog Box. |
| Confidence |
Indicate the level of confidence that you have in the customer opportunity becoming a donation.
This information is entered as a percentage without the % symbol. |
| Type |
Enter a categorization for the opportunity. |
| Solicitor Customer |
Enter the customer number of the person who will be actively soliciting the donation.
For more information, refer to The Find Customers Dialog Box. |
| Details |
Enter any relevant information pertaining to the opportunity. |
| Staff Customer |
Enter the customer number of the staff member who will be handling the solicited donation within AudienceView.
For more information, refer to The Find Customers Dialog Box. |
| Association |
Specifies the relationship between the opportunity and the customer who is being solicited for the donation, so that customers can more accurately be targeted for marketing purposes.
For more information, refer to Customer Associations and Message Sources. |
Forecast Section
The following image illustrates the forecast section of the Customer Services application Customer|Activities page:

The forecast section of the Customer Services application Customer|Activities page contains the following properties:
| Field |
Description |
| Date |
This is the date that you expect the donation to be asked for ('Ask Amount'), the date the donation was promised ('Expected Date') and/or the date that the donation was received ('Projected Date'). Enter the date or select a date by clicking .
For more information, refer to Using the Calendar to Select a Date. |
| Plan Amount |
Enter the monetary value that you anticipate the customer will donate. |
| Ask Amount |
Enter the monetary value that you will be asking the customer to donate. |
| Expected Amount |
Enter the monetary value that you have been promised by the customer. |
| Projected Amount |
Enter the monetary value that you have received from the customer. |
The totals of each column appear in the blue header row.
Monthly Distribution of Forecasts
Forecasts can also be distributed across a number of months.
The following image illustrates the monthly distribution window that appears when 'Monthly Distribution' is clicked:
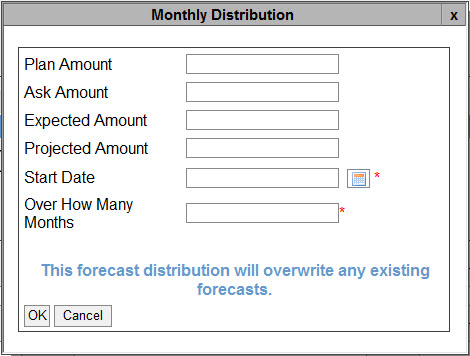
If forecasts have already been set on the forecasts section of the page, the fields will be populated with the total values that appear in the blue header row.
The monthly distribution window contains the following properties:
| Field |
Description |
| Plan Amount |
Enter the total monetary value that you anticipate the customer will donate over the course of the defined months ('Over how many Months' field). |
| Ask Amount |
Enter the total monetary value that you will be asking the customer to donate. |
| Expected Amount |
Enter the total monetary value that you have been promised by the customer. |
| Projected Amount |
Enter the total monetary value that you have received from the customer. |
| Date |
Enter the date that you want to begin the monthly distribution of the forecast from or click to select a date.
For more information, refer to Using the Calendar to Select a Date. |
| Over How Many Months |
Enter the number of months that you want to distribute the 'Plan Amount', 'Ask Amount', 'Expected Amount' and 'Projected Amount' across. |
 |
Caution
If forecasts have already been set, on the forecasts section of the page, the information entered in the Monthly Distribution window will overwrite them. |
If the 'Plan Amount', 'Ask Amount', 'Expected Amount' and/or 'Projected Amount' cannot be evenly divided by the number of months that the forcast is distributed across, the remainder will be added to the last month.
Customer Opportunity Data Section
The following image illustrates the customer opportunity data section of the Customer Services application Customer|Activities page:
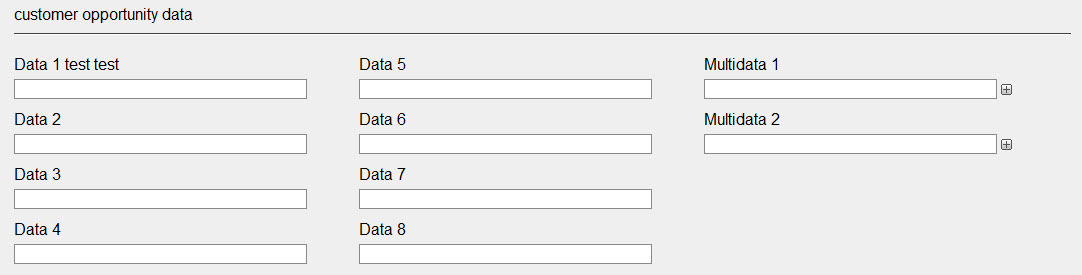
The customer opportunity data section of the Customer Services application Customer|Activities page contains the following properties:
| Field |
Description |
| Data [1-8] |
Enables you to store additional information specific to your organization.
Any data entered into these fields is searchable through Business Intelligence. To modify a data field label, navigate to the Registry application Registry::EN::Business Objects::TSopportunityBO::Opportunity node and select the field that you want to re-label. |
| Multidata [1-2] |
Enables you to store additional information specific to your organization. To add additional fields, click or press CTRL+TAB once you have made an entry.
Any data entered into these fields is searchable through Business Intelligence. To modify a multidata field label, navigate to the Registry application Registry::EN::Business Objects::TSopportunityBO::Opportunity node and select the field that you want to re-label. |